

How to Configure Zerto Virtual Protection Groups VPG
Hi all,
Today we will discuss about how to configure a virtual protection group VPG.
In my previous posts we discussed about VPG. Previous posts on Zerto,
- Disaster Recovery with Zerto
- Install Zerto ZVM 5.0 for vSphere Environment
- Install Zerto Virtual Replication Appliance VRA on VMware ESXi
Below screenshot shows how I created my Zerto lab environment with vSphere.
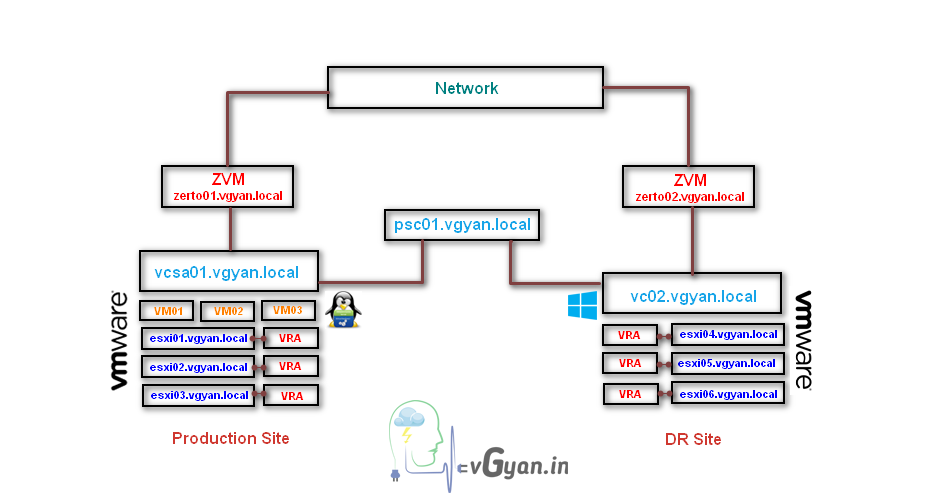 Lab environment created for Zerto VMware to VMware DR test.
In my lab environment I have three virtual machine, so I will create two VPG group.
Let’s start, open Zerto Virtual Manager (ZVM) web client (protected site).
Click on VPG tab, as you can see below screenshot, I don’t have any VPG right now.
Click on NEW VPG option in the right top.

Once create VPG page opens, in the GENERAL tab provide VPG Name: vGyan-Prod-VPG-01
Priority: Medium
Three types of priority’s are available in VPG.
- High
- Medium
- Low
Highest priority VPG will be transfer through WAN first, rest all after that.
Click Next to continue:-

From the VM’s tab, select VM’s and click on right arrow to add the VM’s in to Selected VM field.
You can define the VM boot order according to your application requirement.
The VPG should have at least one VM, VPG can support up to 60 disks, requires 4 SCSI controllers each with a maximum of 15 disks.
Click Next to continue:-

In the REPLICATION tab, specify the recovery site and default values to use for replication to the protected site.
Replication to: vGyan-DRSite(192.168.0.131) it’s my second site created for DR test, if you want to replicate to the same site(protected site), select same site from drop down menu.
In the Default Recovery Service,
Host: vGyan-CL-02 (I am selecting my DR site cluster here) if you want to select any particular ESXi host you can select form drop down menu.
Datastore: select any available datastore with required space.
Journal History: I am keeping it for only 1 day, In production environment we can keep this journals up to 30 days.
Target RPO alert we can modify, I am setting 5 min as my Recovery Point Objective.
Click on Journal History ADVANCED icon.

Once the Advanced Journal Settings opens, you can set Journal History in days.
If you want to change the Journal Datastore select any other datastore from the drop-down menu.
Set Journal Size Hard limit: default it’s coming with 150 GB. You can change according to your environment.
Journal Size Warning Threshold: I am keeping my threshold as 112 GB.
Click OK.

In the Replication tab, click on Advanced VM Replication Settings,
If you want to change a particular VM Journal History settings you can change here. I am keeping default datastore.
Click OK and Click Next on Replication tab.

In the STORAGE tab,
We can change particular VM storage properties.
I am selecting thin disk option for my VMs, if you have any Temp data drive in your VM you can replicate that with Temp data option.

In the RECOVERY tab, Specify the default recovery network to use and the script to run as part of the recovery.
We have to select Network Port for virtual machine’s in the recovery site.
Default Recovery Settings,
Failover/Move Network: DC2-Prod-VM (prod VM port group)
Failover Test network: DC2-Prod-VM ( for test failover also I am using same port group)
Recovery Folder: I am going with default Discovered Virtual Machine folder in recovery site.
If you want to change any network property on a particular VM, select VM SETTINGS option.
If you want to run any pre defined script on the recovery time, you can provide it on the Pre-recovery script area.
Click Next to continue:-

In NICs tab, provide NIC details for the recovering virtual machines.
With this option we can set the IP address for a particular VM while performing a failover or a test failover. With help of VMware tools Zerto will change the IP in recovered VM. If it is a Windows VM once the failover happened, it will restart twice in the recovery site. After the second reboot IP will change according to the VPG settings.
For editing NIC card properties, Select NIC card and click on EDIT SELECTED option.

Once Edit NIC tab opens, set NIC property’s for failover/move option.
Select Network: DC2- Prod-VM
Create New MAC address: No
change New vNIC IP Configuration: Yes, STATIC
IP Address: 192.168.0.151
Subnet Mask: 255.255.255.0
Default Gateway: 192.168.0.1
Preferred DNS server: 192.168.0.10
DNS Suffix: vgyan.local
I am going to copy same properties for failover test as well.
Click OK.

Now we can see, Failover IPs and Test IPs are updated according to NIC properties.
Click Next to continue:-

In BACKUP tab, we can select off-site backup to enable savings the protected VMs off-site up to one year.
This backup is not a complete backup solution. If you want to keep a copy of your protected VMs, we can save it in a backup repository.
Select Backup as ON.
Select any available Backup Repository, I created a separate SMB share for backup repository.
I am keeping 1 month retention period and scheduling backup Job for every Sunday.
We will discuss about Zerto Backup and Backup repository later.
If you have any post backup script, you can provide in the Post-Backup Script field.
Click Next to continue:-

Now we are in the SUMMARY tab, verify all the details and click on DONE.

VPG started creating on Protected site.

Same time VPG started creating on the recovery site as well, Started delta sync.

As I said created two VPG’s, vGyan-Prod-VPG-01 (2 VM’s) and vGyan-STG-VM (1 VM)
we can see both the VPGs in the protected site.

Same we can find out in the recovery site as well, Both VPG’s are completed initial sync. If any block level changes happens in the VM level, changes will replicate to the recovery site.

So we successfully created VPG in both protected and recovery sites.
In the upcoming post we will discuss more on Zerto Backup and Failover Test.
I hope you enjoyed reading this post. Feel free to share this to others if it is worth sharing!!!


